75.3 VNC
The VNC server (vino is the one we use on Debian and Ubuntu) is initiated from the remote user’s desktop from the System menu found in the top panel of the GNOME desktop. Using the left mouse button, click the System menu and then click the Preferences sub menu and then the Remote Desktop item to obtain the Remote Desktop Preferences window (Figure ??).
 ~
~
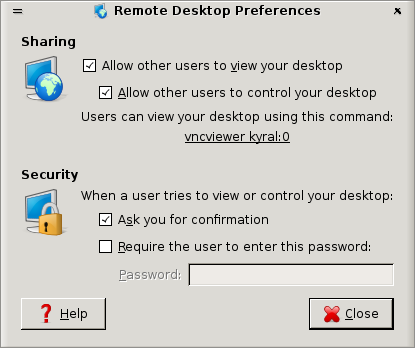
Remote Desktop Preferences {#fig:RemoteDesktopPreferences}
Alternatively, the Remote Desktop Preferences window can be obtained by running the -, vino, preferences command (from the vino package) from the command line in a terminal:
The server is enabled by clicking left mouse button in the first check button under the Sharing label (Allow other users to view your desktop). The server enables other users to view the desktop that is running on the same computer as the VNC server. We notice that a second check button is also enabled, by default. This allows other users to control the desktop in that they can control the mouse and type on their own keyboard. If the aim is to provide support and instruction then this is useful.
The next couple of lines of text indicate a command that the remote user can now issue to view this desktop. We have at least two options though (including the suggested vncviewer command), and this is discussed shortly.
Continuing with the Remote Desktop Preferences, we leave the Security options as they are. The default is that when someone seeks to display the desktop the user (the one running the VNC server) is first asked for confirmation. As an added security measure the server can be set up to request a specific password be supplied. The default is to not require a password, and that is generally okay.
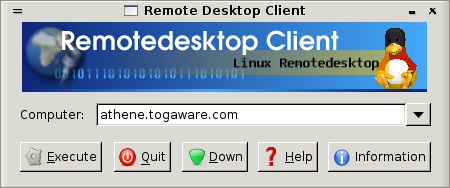
From the client end (that is, the other computer where we want to display the remote desktop) we start up the Remotedesktop Client, which is available with a click on the Applications menu (of the top GNOME panel), then the Internet sub menu and then the Remotedesktop Client item. This will display the Remote Desktop Client window shown in Figure ??.
Remote Desktop Client {#fig:RemoteDesktopClient}
In this example we have entered the hostname of the remote computer (a
random example of athene.togaware.com). We need to enter the
computer name (i.e., hostname) or IP address (something like
192.161.54.21, for example) of the computer running the server. Then
left mouse button click the Execute button to actually
request a connection.
After we request a connection from the client to the server a window will popup on that remote server and the user there needs to accept the connection before we can see their desktop (Figure ??). If the remote user is happy for the connection to continue then they will need to click left mouse button on the Allow button.
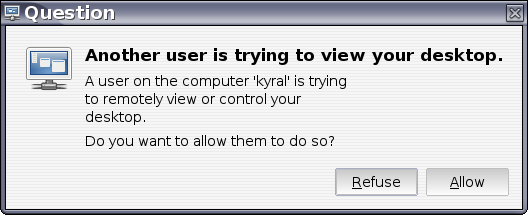
Remote Desktop connection request {#fig:RemoteDesktopConnectQuestion}
A command line alternative to the Remotedesktop Client is vncviewer, as supplied by the xvncviewer package:
Note that the remote desktop could be running MacOS or MS/Windows, or another GNU/Linux variation.
Your donation will support ongoing availability and give you access to the PDF version of this book. Desktop Survival Guides include Data Science, GNU/Linux, and MLHub. Books available on Amazon include Data Mining with Rattle and Essentials of Data Science. Popular open source software includes rattle, wajig, and mlhub. Hosted by Togaware, a pioneer of free and open source software since 1984. Copyright © 1995-2022 Graham.Williams@togaware.com Creative Commons Attribution-ShareAlike 4.0