35.4 Glade Reference
35.4.1 Writing Your Code
35.4.1.1 Finding Your Widget
If you use glade to generate source code for your interface (rather
than using ) you should make use of the
lookup_widget() function that glade defines for you (in
support.c) to access your widgets. You pass this function a
pointer to any widget in a window and the name of the widget that you
want to get (where the name is a string and is the same as the
Name in the Properties dialog for the widget). The
function will return a pointer to the widget whose name matches the
string you supply.
The lookup_widget() function relies on you giving a
pointer to any other widget in the same tree (perhaps a pointer to the
root of the widget hierarchy for that particular application window or
dialog). Usually in a signal handler (the callbacks that you write in
callbacks.c) you can use the first argument to the signal
handler as the first parameter to lookup_widget(). For
example you may have a button in you window called button1
and when it is clicked you may want to access some text entry field
that has the name ``entry1.’’ In callbacks.c
you may have a callback:
void
on_button1_clicked                     (GtkButton       *button,
                                        gpointer         user_data)
{
  GtkWidget *entry1;

  entry1 = lookup_widget (GTK_WIDGET (button), "entry1");

  ...
}
Internally glade uses gtk_object_set_data() for
storing pointers to all the widgets in a window using the names set in
the property editor as the key. Then, inside
lookup_widget(), gtk_object_get_data() is
used to retrieve the pointer indexed by this key. These two functions
are also available to the developer for their own purposes.
35.4.1.2 Using the GTKExtra Libraries
To make use of these libraries you will need to add the appropriate
libraries to your src/Makefile.in and make appropriate
modifications to autogen.sh and configure.in. Or
perhaps you ONLY need to add to the appropriate LIBS line in
src/Makefile.am. This seems more likely.
35.4.1.3 Global and Local Pointers
An eternal issue in GUI development is how to get hold of the pointer to the individual widgets when you need them. Should they be accessed from global pointers that then restrict you to a single instance (or a known number of instances) of the widgets a priori, or is there a better mechanism?
35.4.1.3.1 Global Top Level Widgets
One solution is to have the top level widgets global. This then allows
all child widgets to be accessed using lookup_widget()
provided by glade.
35.4.2 Options for the Command Line
Normally you construct your GUI interactively with glade and then choose to build the C code for the interface with the Build button. It is sometime inconvenient to fire up glade just to build the C source code from the glade XML file. Instead you can do the conversion from the command line with:
If the command line option is not supplied, but a gladefile
is supplied, then glade will start up and load the specified
project.
35.4.3 The Menus and Toolbar
We now explore each of the menus in a systematic and comprehensive way. There are five main menus and four of them (excluding View) should look pretty familiar to the GNOME desktop user: File, Edit, Settings, and Help.
The toolbar provides a shortcut to some of the menu items. Rather than specifically covering them separately we identify their functionality below with their corresponding menu action.
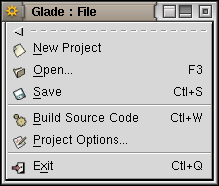
35.4.3.1 The File Menu
The File menu provides the usual New Project, Open…,
Save, and Exit
operations. In common with all GNOME applications F3
is the keyboard shortcut to open a project from a file,
Ctl+S is the shortcut to save a project to a file, and
Ctl+Q is the shortcut to quit from glade.
 %
%
35.4.3.1.1 New Project
The New Project returns the project options to their default values (the same as when you start glade without providing it a project file name). You will be asked to confirm that you wish to start a new project. Be sure you have saved the current project (if there is one) before you start a new project. Click the Cancel button on the popup if you have not yet saved the current project and wish to do so. Then choose New Project again. Click on the OK button to proceed.
35.4.3.1.2 Open
If you have an existing glade project you can Open it
through this menu item, or through the Open button of the
 %
toolbar, or through the
%
toolbar, or through the F3 shortcut, or else on
the command line if you start glade from a gnome-terminal.
Via the menu, button, or keyboard shortcut you will be presented with
a File Selection Dialog to choose the glade project file.
Like all GNOME (actually all Gtk+) applications tab-completion is
active in the File Selection Dialog. Thus you can type
Pr<tab> and it will be completed to Project/gwords
if that is the unique completion. For non-unique completions you will
see a list of possible completions in the File list.
35.4.3.1.3 Save
glade currently does not keep tabs of whether you have saved your
project.
 %
Be sure to do so with the Save menu item or the
Save button or the
%
Be sure to do so with the Save menu item or the
Save button or the Ctl+S keyboard shortcut.
You can do this anytime and it is useful to be in the habit of saving
your project regularly. Saving the project writes the current
interface to a glade project file which stores the interface in a
compressed (gzip) XML format. See Section 35.5.3
for details of the save format.
The first time a project is saved (when no project file already exists) glade will present the Project Options dialog. This gives you an option to set the location of the project files and to set various source code options.
Each time glade saves the project the previous version is saved
into a backup file (e.g. gwords.glade.bak). Only the most
recent backup is kept.
35.4.3.1.4 Build Source Code
The File\(\rightarrow\)Build Source Code
menu item (and the Build button and the Ctl+W
 %
keyboard shortcut) will generate the source code that implements the
interface.
%
keyboard shortcut) will generate the source code that implements the
interface.
The language code generated is chosen from the Project Options
dialog under the General options tab (see section
35.4.4). The default is C source code which
is supported natively by glade. Generation of C++, Ada95,
Perl, and Eiffel is effected through helper applications. These need
to be available on your system if you are to build the interface in
these languages. If glade can not find the appropriate
helper application it will pop up an explanatory window and show the
message ``Error writing source’’ in the main window status bar.
See Section 35.4.3.1.4 for a description of the files generated by a build for C.
When you select to build your project source code if you have not previously saved the project the Project Options dialog will be displayed allowing you to set the project paths and other options. Otherwise glade will silently generate the source code.
35.4.3.1.5 Project Options
The File\(\rightarrow\)Project Options…
item will bring up the Project Options dialog. See
 %
Section 35.4.4 for details.
%
Section 35.4.4 for details.
35.4.3.2 The Edit Menu
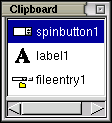
glade has a cut and paste facility, placing widgets into the a
clipboard. The clipboard can be viewed by choosing View\(\rightarrow\){Show Clipboard}. Note the shortcuts are
the standard Ctl+X for Cut,
Ctl+C for Copy, and Ctl+V for
Paste.
 %
%
35.4.3.2.1 Cut
The Edit\(\rightarrow\){Cut} menu item (and its
Ctl+X keyboard shortcut) will remove the selected widget
(and all of its children widgets) from the canvas. The widget
(together with its children) will be placed on the clipboard
as a single item. Later on you can select this widget on the clipboard
and paste it onto your canvas.
35.4.3.2.2 Copy
The Edit\(\rightarrow\){Copy} menu item (and its
Ctl+C keyboard shortcut) is similar to Cut in
placing the widget (and its children) on the clipboard,
except that the widget is not removed from the canvas.
35.4.3.2.3 Paste
After cutting or copying a widget the
Edit\(\rightarrow\){Paste} menu item (and its
Ctl+V keyboard shortcut) will place that widget onto the
canvas to replace whatever is currently selected. This may mean that
a currently selected widget will be replaced by the pasted widget. To
avoid this ensure that what is currently selected is an empty place
holder.
What is actually pasted at any time depends on what is selected in the
clipboard. By default the most recently cut or copied widget
is selected in the clipboard. You can change the selected widget in
the clipboard simply by clicking on it.
 %
%
35.4.3.5 The Help Menu
The Help menu provides access to three useful reference documents and the mandatory About… dialog. (Note that the reference documents are only available, currently, with the GNOME version of glade.)
The Help\(\rightarrow\){Quick-Start Guide} is
a short document that reviews the main glade interfaces and what
happens when glade generates source code.
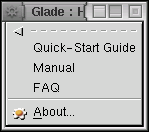 %
The Help\(\rightarrow\){Manual} is under development but
provides details of all interfaces. The
Help\(\rightarrow\){FAQ} contains a collection of typical
questions asked by new users of glade.
%
The Help\(\rightarrow\){Manual} is under development but
provides details of all interfaces. The
Help\(\rightarrow\){FAQ} contains a collection of typical
questions asked by new users of glade.
The Help\(\rightarrow\){About…} menu item brings up the About dialog which identifies the version of glade. This is useful if you need to report bugs or problems you are having. The copyright message identifies the owner of glade. The author’s name and email address then appear followed by a short description of the what glade is and a ULink for its home page. The glade About dialog is a good example of how to use the GNOME dialogs.
35.4.4 Project Options
The Project Options dialog allows you to tune many aspects of the project you are developing with glade. The types of options fall under three tabs: General, C Options, and LibGlade Options.
35.4.4.1 General
The General options cover the project location, project names, programming language, and if to support GNOME.
35.4.4.1.1 Basic Options
The Project Directory lists the directory in which the saved project file will be stored. This is also where the built source code will be written. Use the Browse button to identify a directory using a File Selection Dialog (which allows you to also create directories if you wish). As you change the the Project Name, Program Name, and Project File values will also change, unless you have already changed these other fields separately to give them a different name.
When you save or build a project the directories will be silently created as needed.
The Project Name is the name of your project. This will be used as the title of the main application window you create (the GNOME Application Window). The name can have spaces and other characters. As you change the name of the project the , and Project File fields also change to reflect your project name (with spaces and other non-alphanumeric characters converted to dashes).
The Program Name is the name by which the final executable program will be known. This is used by glade to name the output executable file in the Makefile it generates. Once again, as you change this field the following field (Project File) automatically changes to be the same. The previous fields do not change.
The Project File is then the file located in the
Project Directory in which the interface is saved. This file
has the extension .glade and is a gzip’ed XML document that
records all of the project information. See
Section 35.5.3 for details.
35.4.4.1.2 Subdirectories
The Subdirectories fields indicate where glade should place source code files it generates (Source Directory) and where glade should place any pixmaps (graphics) used in the project (Pixmaps Directory). These subdirectories are located in the Project Directory and are silently created by glade when it builds the project.
35.4.4.1.3 Language
A choice of languages is available under Language. Only one can be chosen at a time. The choice tells glade what to do when the Build button or menu is chosen. See Section 35.4.3.1.4 for details. The choices are C, C++, Ada95, Perl, and Eiffel. Note that this is not relevant when using libglade as the conversion is effectively performed at run time.
Your donation will support ongoing availability and give you access to the PDF version of this book. Desktop Survival Guides include Data Science, GNU/Linux, and MLHub. Books available on Amazon include Data Mining with Rattle and Essentials of Data Science. Popular open source software includes rattle, wajig, and mlhub. Hosted by Togaware, a pioneer of free and open source software since 1984. Copyright © 1995-2022 Graham.Williams@togaware.com Creative Commons Attribution-ShareAlike 4.0